|
Visual Studio .NET
2003 Tutorial -
Step-by-step
Using Visual
Studio .Net 2003, Building C++ .Net
Console Application |
The code used based on the
old VC++ .Net syntax.
Indusoft
- like HMI Software, SCADA System, OPC, Web Studio, Web
SCADA, VC++ Source
Code 2025
Download Visual Assist
VC++
Tool: Visual
C++ and SQL generator for ODBC Database, with
source code sample
Visual C++ XML Article, Load Parse and
save XML Document with
MSXML Library
Get
Business Card / Label
Print Component
C++ Source Codes
Visual C++ Express
Download
Free
EMF to SVG File Convert
Tool
HMI-SCADA
Software
from UCanCode Software
C#
Article: Graph Draw and Layout Control Source Code
Visual Studio 2013
VC++ XML Read and Write Article:
C++ Source Code for Creating and Processing XML documents
Hosting
WPF
Content in an
VC++ MFC
Application
C++
Property Grid Control
SVG Vector
Graphics Editor With Source Code
VC++ Demo: Drop
down Combo Box in CTreeCtrl and
CListCtrl
HMI and SCADA LED Control
Graphics Drawing Tool by with C#
Source Code
Free VC++ Port / IO Serial Communication Source Code
 .NET
HMI & SCADA Solution. .NET
HMI & SCADA Solution.
PLC Programming, Read data from PLC, Write Data to PLC, PLC Communication
OpenGL Line draw, 2D Graphics, and Render Article and Samples
Code
HMI & SCADA Designer and ProgressBar
Free Graphics and Free Meter, Free
Dials with C/C++ Source Code, ActiveX Control, .NET
HMI-SCADA Visualization
Solutions for C/C++, Java, C# and VB
Serial Port Communication,
Read data from port Visual C++ Samples
OPC Software
and OPC Server Component
for C/C++, c#
Call
JavaScript from Visual
C++ and MFC, Article and Example
Visual C++ MFC
Class Wizard
Using GDI+
with
MFC or native C/VC++
MFC Extension DLL with AFX_EXT_CLASS
RichEdit Control in MFC CRichEditView and
MSFTEDIT
Introduction to GDI+ in
.NET
Video Capture with Visual C++
GDI+ Font,
Brush
and
Bitmap
GDI+ GraphicsPath
and
LinearGradientBrush
GDI+ Printing.
GDI+
and
DrawArc
and
DrawPath
GDI+ Color
and
ARGB
with
Example
MSBuild VCBuild VBBuild
Features for
Visual C++
Project
2D CAD Draw Application with C# Source Code
HMI Led Contrl and Meter
Control for C#
HMI Graphics Component
with
VC++ Source Code
OPC, PLC, SCADA Component And Source Code
PID process control, Process Simulation, PLC
Real Time, VC++ Source Code
Data Visualization Component, Data Visaulization VC++Source Code Control
with Process Simulation
Software
OpenGL 3D Graph ActiveX Control
Graphics Library for WinCE, Draw Bitmap, Draw
Gif, Draw Jpg with Win CE, Visual C++ Codes
AutoCAD File Format, Read and Write drawing with
Visual C++ Source Code
OPC Client, OPC Server and OPC Component in C++
Source Code
CStatusBar in CDialog,
SetPaneText and CTime,
GetCurrentTime with VC++ Sample
RegisterClipboardFormat
with
COleDropSource, CSharedFile
to
drag to
word and
excel Visual C Codes
Play GIF, Load GIF, GIF
Animate, with GDI+ Example
VC++ Example
CFilterEdit Regular
Expression : Use
Regular Expression to Filter Your Input,
Boost C++ Library
Add proto - logic diagram displays to your
Java, C++, and .NET applications, for the desktop and rich
internet applications.
VC++
MFC Example:
Sharing file folders
using tree control drag
& drop
Printing ActiveX Controls,
C++ Source Code
Factory Pattern in C++
Create COM Object, Build COM Component, ATL Component
with Visual C++
Play MP3 File and MP3 Palyer with Visual C++
Source Codes
MFC Example:
Create Multiple
Thread with CreateThread and CWinThread and
SuspendThread
and
ResumeThread
VC++
Example: Change the background color of a dialog, CDialog,
OnCtlColor
Read DXF File, Write
DXF File, Draw DXF File and autocad with source codes
WinCE MFC TCP
SOCKET AND UDP SOCKET Sample Codes
VC++
MFC Example:
Adding VBScript and JScript support in your C++
applications
Visual C++ 2010 Article: MFC Thumbnail
Preview and Com DLL with Com Interface
Visual C++ 2010
Visual
C++ 2008 Feature Pack
MFC
Example:
WM_KICKIDLE and CCmdUI and
ON_UPDATE_COMMAND_UI and
WM_IDLEUPDATECMDUI
Create HTML Help and HTML help workshop with HtmlHelp
VC++ MFC Example
MFC
Sample Code:
TrackMouseEvent and GetCapture or SetCapture and
ReleaseCapture and GetCursorPos
MFC
Source Code:
SQLPrepare and SQLAllocStmt with CDBException
and SQL Query and ExecuteSQL
VC++ Codes:
Draw text along line and
draw rotate text
Converter Convert RTF to HTML
with VC++ Source Codes, and
RICHED32.DLL
C++ XML Parser
VC++ Example:
SaveDC and RestoreDC, IsPrinting and GetSysColor
High-speed Charting Control, Real Time Chart,
Data Visualization, C# Source Code
Draw transparency image file,
Alpha Blending using GDI+ Sample
Draw Curve Line
with
VC++/MFC
visualization
Control
VC++ Example:
Load or Save Dib Bitmap File,
GetScrollPosition and FillRgn or CombineRgn and
Create Cursor
Date-Time Edit Control
A simple mucancode.neted
date-time editor. VC++
Article Source Code
and
GetWindowText
MFC
Article:
Keep an Window Always on Top with
WS_EX_TOPMOST and
OnWindowPosChanged
GDI+
Example:
Draw
Curve ActiveX Control
GraphicsPath and Graphics
3D font OpenGL ActiveX Control with Visual C++
Source Code
VC++ MFC Project Setting, Unicode,
MBCS,_MBCS
or
_UNICODE,
wWinMainCRTStartup
Windows hook programming with
VirtualProtect,SetWindowHookEx and beginthread
E-XD++
GDI VC++ Drawing Example:
Draw
Animate Line with CBrush
OpenGL printing and Print Preview with Visual C++
VC++
Example:
splitter control in dialog UpdateWindow
GetWindowRect GetDlgItem
Add Phthon
in or into C++ Application with Visual C++ Article or Tutorial Source Code
MFC
Sample: Display or Create Splash Screen, Show
Transparent Bitmap with SetWindowRgn
Screen Capture , to Clipboard, C++ Source Code,
Get bitmap of Window
Create
Multiple Language to MFC Extension DLL Toolkit with Resource only
C#
Aircraft Instrument Control
Visual C++
Example:
Load DIB Bitmap File and Save Bitmap file and
Convert dib to bitmap and rotate bitmap file
Visual C++
2008 Feature Pack:
MFC Visual
Studio Office 2007 Style Enhancements
Real Time Graph Control, Plot ActiveX Control
with Visual C++
Visual C++ Sample:
Resize dialog, Resize Property Sheet and Resize
Property Page with
								CPropertySheet
								and CPropertyPage
Visual
C++ Serial Data Communication, with Open Port,
Close Port and Write, data tranmission, and read
data
Visual Studio example
and Visual Studio Tutorial and mfc tree control
OLE DB Sample, Database, Atldbcli.h,CoInitialize,
MoveNext
Visual C++
Example
MFC
MDI and SDI Example to create ruler
scrollview and splitter
CDialogBar, CBitmapButton in Dialog Bar,
SubclassDlgItem and EnableDocking
VC++ Example
CEdit-derived
Hyper link
control, so user can edit
hyper links
VC++ Control: Spell Checker Control Source
Code
Create MFC VC++ Static Library, UpdateData and
LoadIcon
VC++ Code:
Change the font of window with SetFont and EnumChildWindows and
CreateIconFromResource
MFC
Example:
Copy, Move and Delete files and rename directories, SHFileOperation
and CFileFind and FindFirstFile with
FindNextFile
Free Codes with
BITMAPINFOHEADER
and CreateDIBSection
Direct2D Vector Graphics Rendering with Visual C++, MFC
Add Skin to your
Visual C++ MFC
application, download source codes
VC++ Ado Tutorial
with VC++ Ado Sample and VC++ Ado Example
VC++
Sample:
Convert EMF to WMF using GDI+
GetDeviceType
and _splitpath
with
lstrlen
and
lstrcat
VC++
MFC Example:
Create
or show Progress Bar/Edit Control/Combobox
Control/icon in a status bar
MFC Sample:
Add status bar to an MFC
dialog,
CStatusBar
VC++
Sample:
Multiple Views layout of
RepositionBars and DeferWindowPos with
RecalcLayout and UpdateAllViews
VC++ GDI Example:
GDI
AlphaBlend
and Bitmap Alpha
Create VC++
MFC Chart Control, Drawing and Priint Bar
Chart, Source Codes
VC++
Example:
Return or Esc Key
with EndDialog and OnSysCommand
DPtoLP
and LPtoDP,
CPrintInfo and
GetDeviceName and
DOCINFO with
Direct2D & DirectWrite, Draw and Rendering text C++ Source Code
Database Programming with
C/C++, with mySQL
UML
Diagram Component / Drawing C++ Source Code Solution from ucancode,
it will save you 50% - 80% time for building any UML based application.
call VC++ / C++ and MFC DLL function with VB Program
MFC Sample Code: Load and Display
PNG Image File
MFC
Source Code:
File dialog with image preview
WM_QUERYNEWPALETTE
and
WM_PALETTECHANGED
MFC
Example:
CoInitializeEx and
SHBrowseForFolder
with file folder browser
Store and read from XML File
with .NET and C# framework,
C++/MFC Example
Visual C++ and MFC Appwizard:
CMDIChildWnd with
CenterWindow AfxGetMainWnd
Visual C++ Article:
free image library
with
image viewer with
CxImage and CListCtrl
thumbnail images
VC++ MFC Codes:
Display Message Balloon Tip Window with
SetWindowRgn and CreateRectRgn and CombineRgn
VC++ Example:
Draw or display Real-time data
plot Chart
Windows Debug - Debug Application Crash, Visual
C++
Draw, Print and encode UPCA barcode
and UPCE barcode, and EAN13 barcode
with VC++ Codes
LoadResource
FindResource and LockResource, with UnlockResource or VC++ Sample
MFC
Example:
Docking CSizingControlBar Windows inside ActiveX
Control with CFrameWnd and SetTimer
Visual C++ Codes: BITMAPINFO, GetDIBits,
BITMAPINFOHEADER, PBITMAPINFO, RGBQUAD,
DIB_RGB_COLORS
VC++ Example
Capture Print Screen to
Clipboard including
dropdown menu,
SetWindowsHookEx
and
UnhookWindowsHookEx,
with
RegisterWindowMessage
_TrackMouseEvent, GetWindow,
GetWindowRect, SubclassWindow, GetWindowLong, SetWindowLong,
Drawing, VC++, source code
Full Screen with
CWnd and
Diagram Like Microsoft Visio 2007
Spell Checker with VC++ Source Codes
and CStringArray with TrimLeft, TrimRight and CompareNoCase CWaitCursor
AfxGetStaticModuleState and LoadLibrary of
GetProcAddress and FreeLibrary
MFC ARTICLE with LOAD DLL
MFC
Multiple Page Print preview Article and
CPrintPreviewState,
it with CPrintPreview and DoPrintPreview, LPDEVMODE and
GetPrinterDeviceDefaults
MFC Example: Rows of CToolBar and
								CToolBarCtrl,
								with
CalcDynamicLayout, with
SetRows
CBRS_ALIGN_TOP , CBRS_SIZE_DYNAMIC and
FloatControlBar
EC61131 PLC Automation Programming and Simulation
Visualization Source Code Kit for C/C++, .NET
VC++
Article
Draw Rotate / slant
text strings
SetWorldTransform
Draw or Paint Spline Curve Line
with VC++ Source Code
ExtTextOut, TabbedTextOut, in
WinCE in VC++
VC++ Example and Article:
Drawing
Double Buffering With GDI+
WPF 3D Article, Tutorial with Chart Graphics C#
Code
Multiple Monitor
Support with
GetSystemMetrics and
AfxRegisterWndClass
VC++ Example
Visual C++
MFC Programming:
Skin CListCtrl with InsertColumn SetItemText and
ListView_SetExtendedListViewStyle
MFC
Article:
Create toolbar with SetButtons and SetButtonInfo
and OnNotify
CListView
Loading Images BMP, PNG, GIF, JPEG, WMF, ICO, and EMF Files
SCADA
Automation Programming Tool And
visualization component Control
VC++ Source Code Solution
C# Example: Free Draw .NET GDI+
Gauge Control with Source
Code
Intouch with SCADA System and HMI, OPC, PLC VC++ Source
Code
VC++ MFC Ruler Control with Source Code,
AfxGetResourceHandle, LoadStandardCursor and RegisterWindowClass
VC++ Article:
Draw Image
Background
and CScrollView
text with bitmap brush
and
PreCreateWindow
VC++
Grid Control Library Source Code
Based on CListCtrl
 |
|
 |
New
Promotional personalized database document
printing Solution
--Variable
Data Printing |
|
A.NET/ VC++ Source Code Component for building any database printing applications that create dynamic, database-driven documents quickly and easily and personalize your promotional communications by varying text, graphics, barcodes, or entire layouts based on information found in your database,
more.. |
 |
Building
your own SCADA Software --
-- Full VC++ Source Codes |
|
Add Diagrams and
SCADA to your applications. E-XD++ Diagrammer brings accurate and
intuitive diagrams and dashboards to your c++ desktop applications. It
offers a comprehensive set of tools, components and graphic objects for
creating visualization, editing and monitoring Windows applications,
more...
|
 |
HMI
and
Graphics Software ToolKit Solution -- Full VC++ Source Codes |
|
UCanCode E-XD++ Visualization ToolKit
is an extremely flexible and robust graphical framework for building visual
interfaces that display real-time data, from Process Control operator
displays and HMI screens to Traffic and Telemetry Monitoring displays and
Supply Chain visualizations. more...
|
 |
New
Real-time data display
Software Component Solution -- Full VC++ Source Codes |
|
UCanCode is the leader of Real Time Graphics Source Code Toolkit, Data Visualization, HMI, UML, CAD, GIS and FlowChart for software developers around the world. Its products are
used to visualize and control real-time and mission-critical
processes in a variety of industries,
more... |
 |
UCanCode
Electronic form solution V12.0
from ucancode |
|
UCanCode software is the
only software company to ship
high quality E-Form Component Source Code in the world. With full edition of E-XD++ Suite, you
have the 100% VC++ / .NET Source Codes
of E-Form Designer and the 100% VC++
/ .NET Source Codes of E-Form Reader,
you also have the license to modify any party of these source
codes to build your own E-Form
Applications, it will save tons of month development time (Save Over 90%
time to building E-Form based application),
more...
|
 |
True
Microsoft word like table Component Control Solution
-- Full VC++ Source Codes |
|
Here
you can find a full
Microsoft Word Like Table Component,
this also the first full MS-Word
like
table
component
that designed for
drawing
and
printing
around the world, full VC++source code
shipped. Add table editing, drawing, printing
capability to your word process applications within a few minutes,
more...
|
 |
UCanCode Dynamic Graphics
and Real-Time Process
Simulator Solution |
|
UCanCode Software Inc. is a leading provider of
HMI & SCADA,
CAD,
UML,
GIS and Data Visualization Graphics
for software developers more than 40 countries around the world!,
more... |
 |
UCanCode SVG Import and Graphics Edit Print Render
Solution |
|
UCanCode E-XD++
Component graphicsd diagram solution is a Source Code based framework for advanced vector
graphics editor, with capabilities similar to Illustrator,
CorelDraw, or Xara X, supporting import the W3C standard Scalable
Vector Graphics (SVG) file format. The full VC++ Source Codes of
SVG
import feature will be shipped.,
more... |
 |
Telecom Datacom map
process flow Solution
from ucancode |
|
The UCanCode E-XD++
Component Enterprise Edition product family provides a complete set
of display components for user interface developers building
telecom or datacom applications.Cut development time by 50%
while delivering industry-standard look-and-feel that helps operators make
rapid, accurate decisions., more... |
 |
Real-time gauge dashboard
diagram solution
from ucancode
|
|
Monitor your critical real-time data using
gauge and digital panel representations. UCanCode
Gauges is a set of VC++ Soure Code Library that
allow developers to quickly and effectively integrate
gauges into their desktop and web-based applications.
UCanCode Gauges includes full C++ source codes
based Radial gauge, Linear gauge,
Digital Meter and Marquee Panel components optimized
for real-time with realistic look and
adaptive styles for your environment,
more...
|
 |
UCanCode Diagram Editor
from ucancode |
|
UCanCode E-XD++
Diagrammer offers a powerful set of tool to help developers quickly and
efficiently create diagrams and process flow. It provides a very
professional diagram editor to automate application production
without coding. This diagram editor tools address the different aspects of
producing appropriate content-based diagram and flowchart displays,
more... |
 |
|
|
The UCanCode E-XD++
Component Enterprise Edition product family enables you to develop
Gis / Map based visualization applications quickly and efficiently.
Map Displays with Custom Objects for .net and C++
Developers E-XD++ provides a complete mapping drawing, display,
printing, software development kit (SDK) for
creating any .net or C++ displays applications quickly and
easily,
more...
|
 |
UCanCode Graph
Display, drawing, Layout solution from ucancode |
|
The E-XD++
Component Enterprise Edition product family enables you to develop
graph visualization applications quickly and efficiently. With
this component, you can easily enhance your applications with advance graph display, viewing and editing,
xml loading, graph printing
technologies support. You can customize both the display and the interactive
behaviors of your application using ucancode leading industry standard components
,
more...
|
 |
UCanCode Home & Office
Plan Drawing and Design solution from ucancode |
|
Each time when you want to
create your own building design and office plan
software, you should consider to use E-XD++
Diagram Component, it is the best component with
almost all the features of Microsoft Visio 2007 and
SmartDraw. It will save you many months for building any
kind of office plan, home building design
and drawing software,
more...
|
 |
HMI
and SCADA Process Flow
Diagram Component Solution
from ucancode
|
Monitoring GUIs for C++, VB, Java, and the
.NET platform
UCanCode XD++ provides a complete set of
services, consisting of design tools and a software development kit (SDK),
for developers who want to create a user interface for industrial
monitoring applications. These displays feature highly customized
graphical objects that connect to underlying real-world data,
more...
|
 |
Circult diagram drawing Component Source
Code Solution from ucancode
|
|
E-XD++ Library is a powerful
diagram drawing component for creating professional-looking
business, technical drawings and illustrations for your documents
quickly and easily. E-XD++ Library is the ideal component for
creating any kind of Electric power diagram drawing application or
circult drawing application,
more... |
 |
UML
Diagram Component / Drawing C++ Source Code
Solution from ucancode
|
|
|
E-XD++
Enterprise Edition Suite is a 100% C++ based
diagram Component, it's UML Diagram
Solution contains almost all the features of
building a high-quality UML Application, as
a UML modeling tool component, it
helps you to quickly and easily build any
kind of applications that has all varieties
of UML diagrams. Developers save 50
to 80 percent of development time when
creating displays with ucancode
Visualization,
more... |
 |
BPMN
Diagram Component / Drawing Source Code
Solution from ucancode |
|
Business Process Modeling Notation
(BPMN) is the standard for modeling
business processes and web service
processes. BPMN is a core enabler of
Business Process Management (BPM), a
new initiative in enterprise architecture.
UCanCode Software provides rich and core
components for Business Process Modeling
Notation (BPMN). It includes
workflows diagram
designer,
E-Form Designer,
and
BPMN Diagram Designer, more... |
 |
Label Print and Report
Print Component Source Code
from ucancode |
|
With E-XD++
Component, you can add advanced printing
functionality to your applications. The
E-XD++ Library is a 100% C++ data rendering
and visualization system, built specifically
for Visual Studio .NET and designed to bring
your User Interface to the printed page. Now
you only need a few days for building a very
powerful label print or report print
application,
more... |
 |
Proto - Logic Diagram
Component Source Code from
ucancode |
|
Add proto -
logic diagram displays to your
Java, C++, and .NET applications, for the desktop and rich
internet applications.
More... |
 |
 E-XD++
Flow Diagram Kit Enterprise Edition 2025
Volume 1 Released,
this is a
maintenance release that includes improved
drawing performance, tons of new features, new
samples, bug fixes and more. See the full list
of changes
here.
E-XD++
Flow Diagram Kit Enterprise Edition 2025
Volume 1 Released,
this is a
maintenance release that includes improved
drawing performance, tons of new features, new
samples, bug fixes and more. See the full list
of changes
here. |
|
1.
Start Microsoft Visual Studio .NET 2003
and create a new Visual
C++ Console Application (.NET)
project named Structs. File menu → Project...
submenu. Type the project name in the Name:
field. Adjust the project location in Location:
if needed. Leave the Solution name as given (by default it is same as project
name).
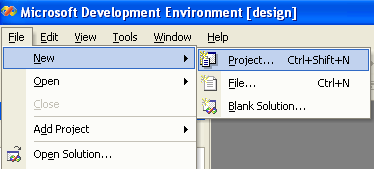
Figure
1: Invoking the new project window.
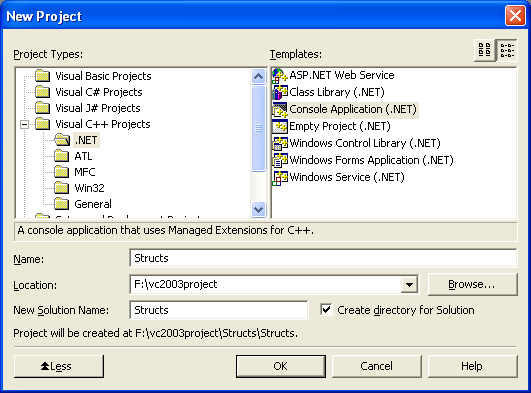
Figure 2: The
new project window, selecting Console Application (.NET)
2.
Open the Structs.cpp, the
main project file. At the top of the Structs.cpp
file, immediately under using
namespace System;,
add the following structure definition:
//
The Point structure definition
__value
struct Point
{
public:
int x, y;
};
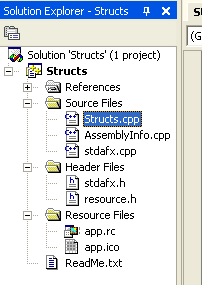
Figure 3: The Solution
Explorer window
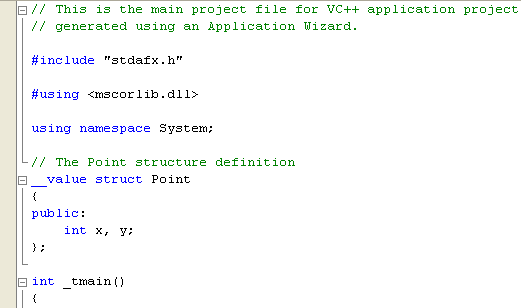
Figure 4:
Adding a structure to the main project file
The
__value and struct
keywords start a structure definition, and you’ll notice that structures look
very similar to classes in the way they are defined. The body of the structure
is enclosed in braces and finishes with a semicolon, and the public and private
keywords are used to set the access level for structure members. Notice the use
of the __value keyword here. This keyword tells the compiler that this is a
value type and not a traditional C++
structure. It’s important that you remember to use __value when defining your
structures. This simple structure represents a point on a graph, so it has two
integer data members representing the x
and y
coordinates.
3.
To create and initialize a Point object, add the following lines to the _tmain
function of your application. Notice the _tmain
instead of main used
in VC++ 2003. _tmain will compiled to wide
character (wmain) or ANSI (main) and it is visible in VC++
2003 only because in VC++ 2005
the main is default to wide character or Unicode.
//
TODO: Please replace the sample code below with your own.
//
Create a Point
Point
p1; // use the default
constructor
//
Initialize its members
p1.x
= 10;
p1.y
= 20;
Replacing
the Console::WriteLine(S"Hello World");
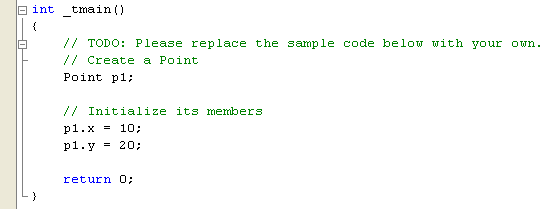
Figure
5: Creating and initializing Point object.
Notice
that the code doesn’t use the new
(new syntax uses gcnew)
operator. The new
operator is used to create references to objects, and value types aren’t
accessed by reference. Instead, a Point has been created on the program stack
instead of the heap, and you access it directly as p1.
Because the data members are public at this point, you can access them using the
familiar dot notation.
4.
Add two lines to print out the value of one of the struct members, like
this:
Console::Write(S"p1.x
is ");
Console::WriteLine(p1.x);
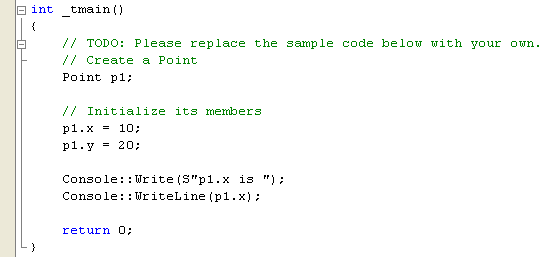
Figure 6:
Printing out the structure member.
5.
Compile and run the program at this point, you should see the output p1.x
is 10. To build, select the Build
menu → Build Solution
submenu and to run select Debug
→ Start Without Debugging
submenu as shown below. You can use the buttons or short cut menu as well.
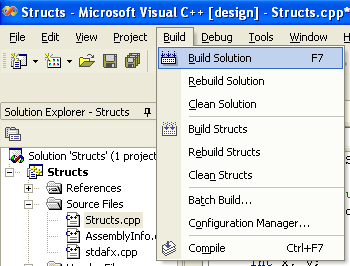
Figure 7:
Building a solution.
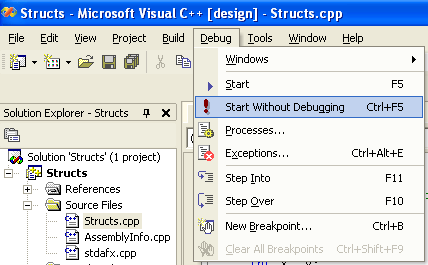
Figure 8:
Running a program without debugging.
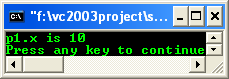
Figure 9: A
program console output.
6.
Let do some more work. Add the following two lines immediately after the
public declaration in your Point structure definition.
Point()
{ x = 0; y = 0; }
Point(int
xVal, int yVal) { x =
xVal; y = yVal; }
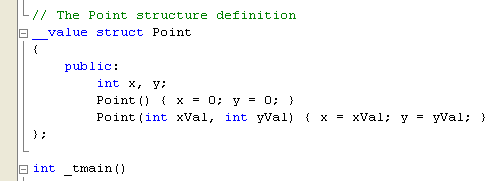
Figure 10:
Adding a user defined constructor.
The
first constructor takes no arguments and simply sets both data members to 0.
A constructor that takes no arguments is called a default
constructor. The second constructor takes two int values and uses
them to initialize the x
and y data
members. In this case, the arguments are simply being copied into the data
members, but it would be simple to add some checking to ensure that the data
passed in is correct. Anyone who has used C++
before will be familiar with the use of default arguments on constructors. You
can’t use default arguments on managed types in Visual
C++, so you need to provide an explicit default constructor.
7.
You can now add extra code to your _tmain function to create and
initialized Points. Edit the _tmain by entering the following codes.
Point
p1; // use the default
constructor
Point
p2(10,20); //
use the second constructor to set x
// to 10 and y to 20
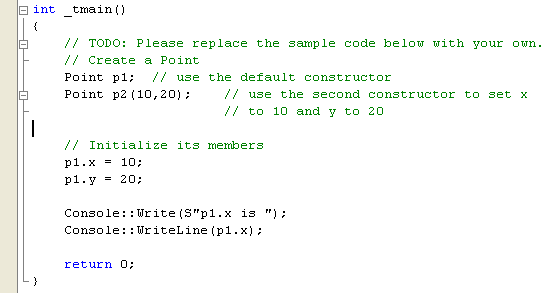
Figure 11:
Creating and initializing another Point object.
8.
Add the following code to see the effect. Notice the using of the string
modifier "L"
instead of "S"
as used in the old C++ syntax. L is for Unicode
(optionally used in the new C++ .Net) and
the S is for managed string (only used in old C++
.Net).
Console::Write(S"p1.y
is ");
Console::WriteLine(p1.y);
Console::Write(S"p2.x
is ");
Console::WriteLine(p2.x);
Console::Write(S"p2.y
is ");
Console::WriteLine(p2.y);
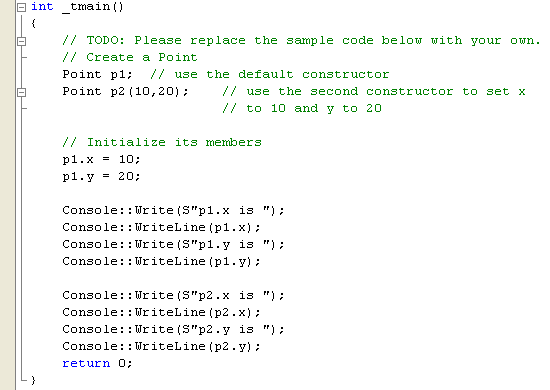
Figure 12:
Adding codes to display values.
9.
Finally, compile and run your program and the following output should be
expected.
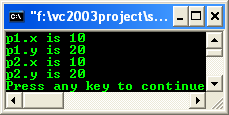
Figure
13: A sample console application program
output.
|