Introduction
This code
shows you how to build a fast and performing control
using C# and .NET
2.0.
I wrote a similar control
as an ActiveX once, using C++,
ATL, and GDI,
and wondered if it is possible to write performing code
using .NET and GDI+.
I needed it for another project. So I wrote this little control
to show that it actually works.
How the code
works
The code consists of a C#
application and a custom control. The custom control
really is the interesting part.
Deriving from Control
We derive from
Control
as this doesn't give us all these properties we don't
actually need like a usercontrol would give us, for
example.
public partial class AGauge : Control
Dealing with
properties
Hiding, shadowing
unwanted properties
Well, there are still
properties that show up in the designer that are not
necessary. In C#,
you can use the
new
keyword to get rid of them (shadows in VB).
public new Boolean AllowDrop, AutoSize, ForeColor, ImeMode
Overriding useful
properties
For properties that you
want to use but with a different behaviour, you can use
the
override
keyword (if overrideable) to tell the program to call
this overridden property instead of the implementation
of the base class, which in our case is the
implementation in
Control.
public override System.Drawing.Color BackColor..
public override System.Drawing.Font Font..
public override System.Windows.Forms.ImageLayout BackgroundImageLayout..
Custom properties
To be able to further
customize the control in the designer, we need to add
some properties of our own. E.g.,
[System.ComponentModel.Browsable(true),
System.ComponentModel.Category("AGauge"),
System.ComponentModel.Description("The value.")]
public Single Value..
The
Browsable
attribute tells the designer to show the property in the
toolbox or not. The
Category attribute
tells the designer where to show the property if the
categorized view is selected, and the
Description
attribute adds a description to the property that the
designer can show in the toolbox.
Events and Delegates
An event can carry
additional information that is sent to the
"listening" program, e.g., the form's event
handler for this event.
Custom event arguments
We want the event to
carry the number of the range the needle is in (if it
changes from being in one range to being in another). To
add some data to the event, we derive from the standard
event args and add a variable which is initialized in
the constructor. This will hold the extra information
sent along.
public class ValueInRangeChangedEventArgs : EventArgs
{
 public Int32 valueInRange;
 public ValueInRangeChangedEventArgs(Int32 valueInRange)
 {
  this.valueInRange = valueInRange;
 }
}
Event delegate
The event handler
"listening" for our event needs to be of a
type that "understands" our event. With the
delegate statement, we define this type.
public delegate void ValueInRangeChangedDelegate(Object sender,
                     ValueInRangeChangedEventArgs e);
And the event
[Description("This event is raised if the value falls into a defined range.")]
public event ValueInRangeChangedDelegate ValueInRangeChanged;
The event is of the
type we defined in the delegate statement. The
Description
attribute enables the designer to show a description for
the event in the Toolbox.
Constructor
The constructor is
called when the control
is created, e.g., before it will be shown in the
designer. Here, we set the style of the control to
enable double buffering. This isn't really necessary
since we will do our own double buffering, but it
doesn't hurt to do so.
public AGauge()
{
 InitializeComponent();
 SetStyle(ControlStyles.OptimizedDoubleBuffer, true);
}
Overriding member
functions
We need to override
some of the member functions.
First, we override
OnPaintBackground
to ensure that the background is not painted each time
the control is
refreshed, this uses too much CPU even if double
buffering is enabled. One drawback is that we need to
handle the drawing of a background image ourselves, but
this isn't too much of a problem.
protected override void OnPaintBackground(PaintEventArgs pevent)
{
}
If the control
is resized, we need to refresh it. So we override
OnResize.
protected override void OnResize(EventArgs e)
{
  drawGaugeBackground = true;
  Refresh();
}
The global variable
"drawGaugeBackground" is set to
true
to tell the control
to completely redraw itself.
Refresh forces
the control to redraw, or if you like to call
OnPaint,
under the hood, a Windows message is sent, but this is a
different story.
Finally, we need to
override
OnPaint to show some output to the
user.
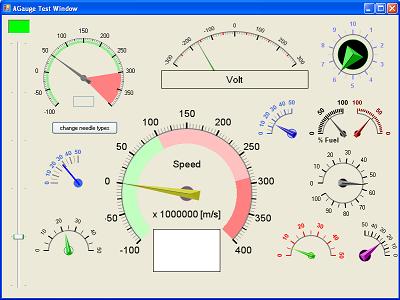
This is what our
control really does, it shows the output to the user. It
doesn't handle user input like a scrollbar would do. A
scrollbar would override
OnMouseMove,
OnMouseDown,
OnKeyPressed, and so on.
OnPaint
is the heart of our control.
protected override void OnPaint(PaintEventArgs pe)
OnPaint,
which is called every time the control
is redrawn, e.g., if the value of the gauge
changed, determines if it should completely redraw
itself or simply paint the background part with the
performant function
DrawImage. If the
background hasn't changed, it only needs to draw
the needle, thus avoiding costly GDI+
functions to be called every time. The background
changes, e.g., if a property like a color has changed,
or the control is
resized, for example.
Conclusion
So it really is
possible to write fast and performing controls with GDI+
if we use double buffering and blitting (DrawImage).
If you like VB better
than C#, you can
search for "SpeedyHMI" on SourceForge, this
project I wrote contains this gauge
written in VB.
Download,
build, run and, Enjoy!
VC++ Example
Capture Print Screen to
Clipboard including
dropdown menu,
SetWindowsHookEx
and
UnhookWindowsHookEx,
with
RegisterWindowMessage
Full Screen with
CWnd and
Diagram Like Microsoft Visio 2007
MFC Example: Rows of CToolBar and
								CToolBarCtrl,
								with
CalcDynamicLayout, with
SetRows
CBRS_ALIGN_TOP , CBRS_SIZE_DYNAMIC and
FloatControlBar
CAM
simulator
Sample with
VC++ MFC Source Code
C# Example:
Free Draw .NET GDI+ Gauge Control
with Source Code
VC++
Sample:
Multiple Views layout of
RepositionBars and DeferWindowPos with
RecalcLayout and UpdateAllViews
Visual C++
2008 Feature Pack:
MFC Visual
Studio Office 2007 Style Enhancements
VC++ MFC Project Setting, Unicode,
MBCS,_MBCS
or
_UNICODE,
wWinMainCRTStartup
VC++ Example:
Draw or display Real-time data
plot Chart
VC++ Ado Tutorial
with VC++ Ado Sample and VC++ Ado Example
Screen Capture , to Clipboard, C++ Source Code,
Get bitmap of Window
Draw, Print and encode UPCA barcode
and UPCE barcode, and EAN13 barcode
with VC++ Codes
MFC
Library Article:
Create Database with SQL Server and ADO Stored
Procedures
C++ Barcode source codes
with draw Code39 Code93 AND Code128A
Code128B with Code128C
Converter Convert RTF to HTML
with VC++ Source Codes, and
RICHED32.DLL
Real time software
and
HMI Software
with
Trend
Chart VC++ Source Code
MFC Sample Code: Load and Display
PNG Image File
Introduction to GDI+ in
.NET
GDI+ Font,
Brush
and
Bitmap
GDI+ GraphicsPath
and
LinearGradientBrush
High-speed Charting Control, Real Time Chart,
Data Visualization, C# Source Code
GDI+ Printing.
WPF 3D Article, Tutorial with Chart Graphics C#
Code
Date-Time Edit Control
A simple mucancode.neted
date-time editor. VC++
Article Source Code
and
GetWindowText
GDI+
and
DrawArc
and
DrawPath
GDI+ Color
and
ARGB
with
Example
Visual C++ Article:
free image library
with
image viewer with
CxImage and CListCtrl
thumbnail images
SVG Vector
Graphics Editor With Source Code
 .NET
HMI & SCADA Solution.
.NET
HMI & SCADA Solution.
Add proto - logic diagram displays to your
Java, C++, and .NET applications, for the desktop and rich
internet applications.
UML
Diagram Component / Drawing C++ Source Code Solution
from UCanCode,
it will save you 50% - 80% time for building any UML
based application.
Using GDI+
with
MFC or native C/VC++