How to install E-XD++ Evaluation Kit?
"UCanCode
Software is a market leading provider of HMI & SCADA, CAD, UML, GIS and
Data Visualization Graphics Source Code Kits for C/C++ and .NET software
developers more than 40 countries around the world!"
|
Notes:
E-XD++ Visualization Source Code kit is full compatible
with Visual Studio 6.0, Visual Studio/2010/2013/2019/2024, and it had full
tested on all windows platforms.
The library include files are located in <install
dir>\UCanCode Software directory. (The default installation folder is "c:\program
files\UCanCode Software\E-XD++ Visualization Enterprise Suite"). The
product LIB files pre-built for Visual C++ 6.0, Visual Studio, Visual
Studio 2013, Visual Studio 2015, Visual Studio 2017, Visual Studio 2019 are
located in <install dir>\Lib (VS2015Lib, VS2017Lib, VS2010Lib, VS2019Lib etc.) directory.
All DLLs are located in your <WINDOWS>\system32 folder.
Download:
 install_use_eval_kit.pdf
Important: it's highly recommended to sign in to Windows as an
administrator to evaluate the product.
- The following convention is used for library/DLL names:
(Note:
If you use
other edition of Visual Studio, please also let us known, we will help you.
Click here!)
| ANSII |
Description |
|
E-XDEnt****.dll |
Visual C++
6.0 DLL |
|
E-XDEnt****.lib |
Visual C++
6.0 Library |
| E-XDEnt****EvalVC100.dll |
Visual
Studio 2010 DLL |
| E-XDEnt****EvalVC100.lib |
Visual
Studio 2010 Library |
| E-XDEnt****EvalVC110.dll |
Visual
Studio 2013 DLL |
| E-XDEnt****EvalVC110.lib |
Visual
Studio 2013 Library |
| E-XDEnt****EvalVC120.dll |
Visual
Studio 2017 DLL |
|
E-XDEnt****EvalVC120.lib |
Visual
Studio 2017 Library |
|
E-XDEnt****EvalVC150.dll |
Visual
Studio 2019 DLL |
|
E-XDEnt****EvalVC150.lib |
Visual
Studio 2019 Library |
Install And Uninstall
By default, E-XD++ Full Evaluation kit is
protected with passwords, mostly, once you get the full edition, two
passwords will be also shipped, one is Unpack password, the other is Install
serial code:
1. the Unpack password is for the following
field:
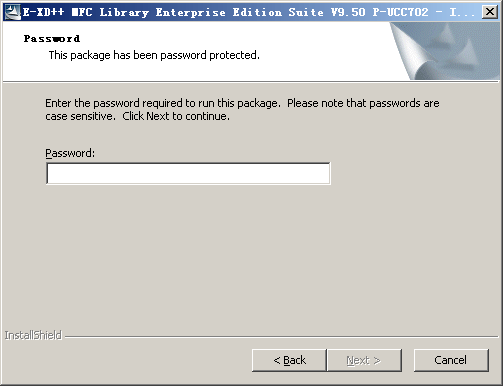
The Unpack Passwords as below:
E-XD++ Professional Edition is:
tHMQ35IL$RpvIMSqDJNlrEK
E-XD++ Enterprise Edition is:
eMVF5$Ddf2006N&CE5nbMVDMDv
(Please note that all of these entries are case sensitive.)
2. The second install serial will be used
with the following dialog:
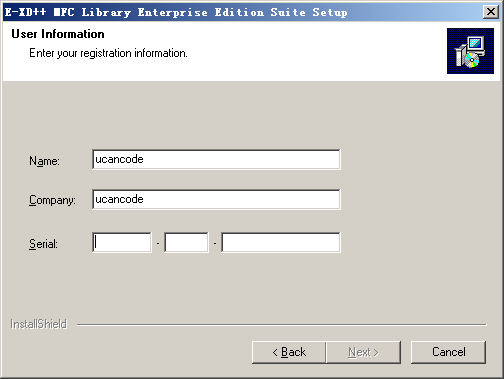
For this dialog, you should enter the following
serial:
UCanCode-demo-1111111111
3.Visual
Studio 6.0
1). Check Visual Studio 6.0 Paths:
a. Click on "Tools | Options..." as below:
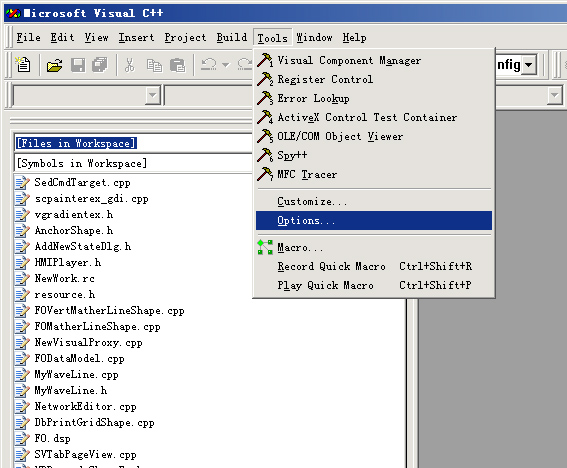
b. With the following dialog, choose "Directories"
tab page:
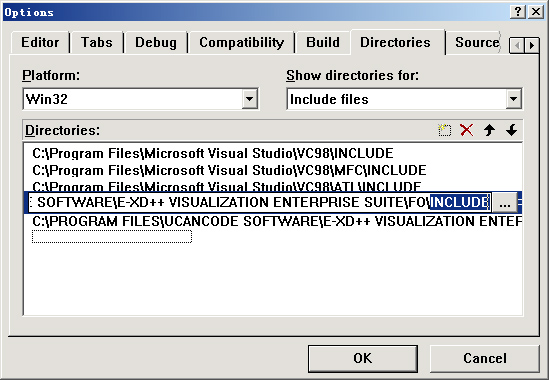
c. From Show directories for combo box, choose
"Include files", and add the following two paths:
C:\PROGRAM FILES\UCANCODE SOFTWARE\E-XD++
VISUALIZATION ENTERPRISE SUITE\FO\INCLUDE
C:\PROGRAM FILES\UCANCODE SOFTWARE\E-XD++ VISUALIZATION ENTERPRISE SUITE\GDI+
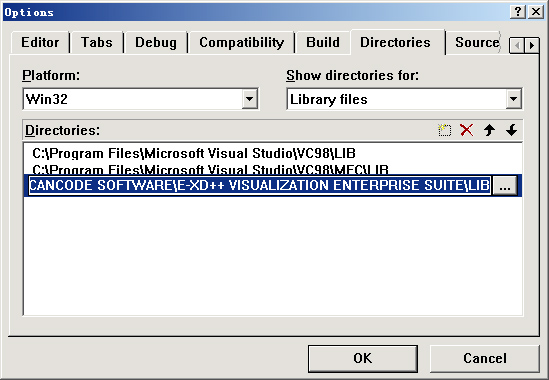
d. From show directories for combo box, choose
"Library Files", and add the following path:
C:\PROGRAM FILES\UCANCODE SOFTWARE\E-XD++
VISUALIZATION ENTERPRISE SUITE\LIB
e. Then you need to close OK, then you need exit
your Visual Studio and open it again (Restart Visual Studio).
f. That's all, you can now open any sample codes of
E-XD++ for building.
2). Problem with Visual Studio 6.0
For some kind of Visual Studio 6.0, when you
rebuild the evaluation edition of E-XD++ samples (include ShapeDesigner
project), the sources compile without error, but when you try to run the
Application,
the following assertion fails:
ASSERT(m_dwRegister == 0);
in the function
BOOL COleLinkingDoc::Register(COleObjectFactory* pFactory, LPCTSTR
lpszPathName)
at line 82 in file OLELINK.CPP
file.
You can try the following steps to fix this
problem:
(1). Select Visual C++ IDE
" Project | Setting"
(2). Set Parameter /MDd to /MD and _DEBUG to NDEBUG
(3). Select OK to make sure these settings and then rebuild all the projects.
The problem will be solved.
4.
Visual Studio 2013
The setting for Visual Studio 2013 is not the same with Visual Studio 2008,
please take the following two steps:
1). Open Visual Studio 2013, and then open E-XD++'s sample TestMDI.dsw (It is
placed within
C:\Program Files\UCanCode Software\E-XD++ Visualization Enterprise Suite\Samples
file folder). You need to convert it before opening.
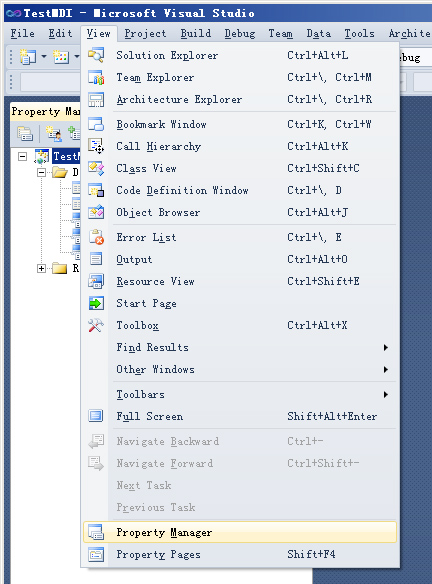
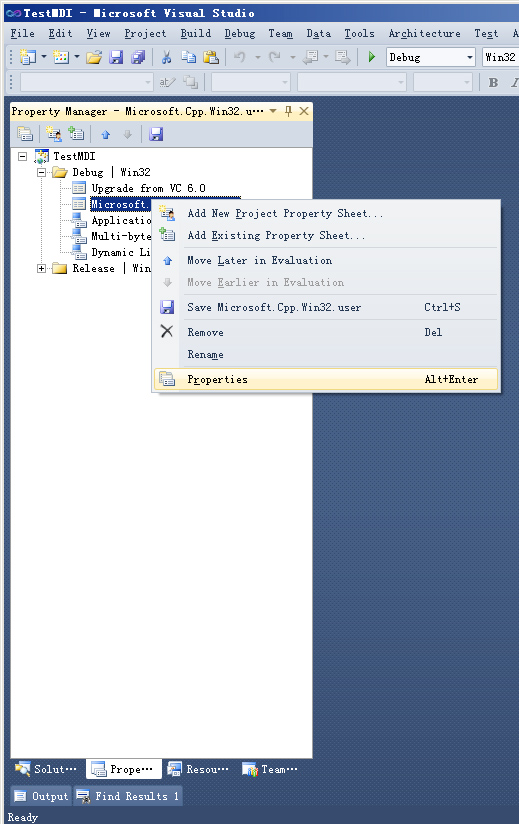
2). Then choose "View | Property Manager" menu item, as below:
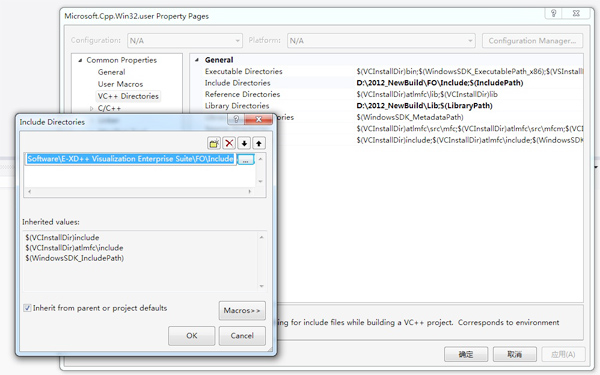
3). With the property manager window, right click on
"Microsoft.Cpp.Win32.user" and choose "Property" menu, as below:

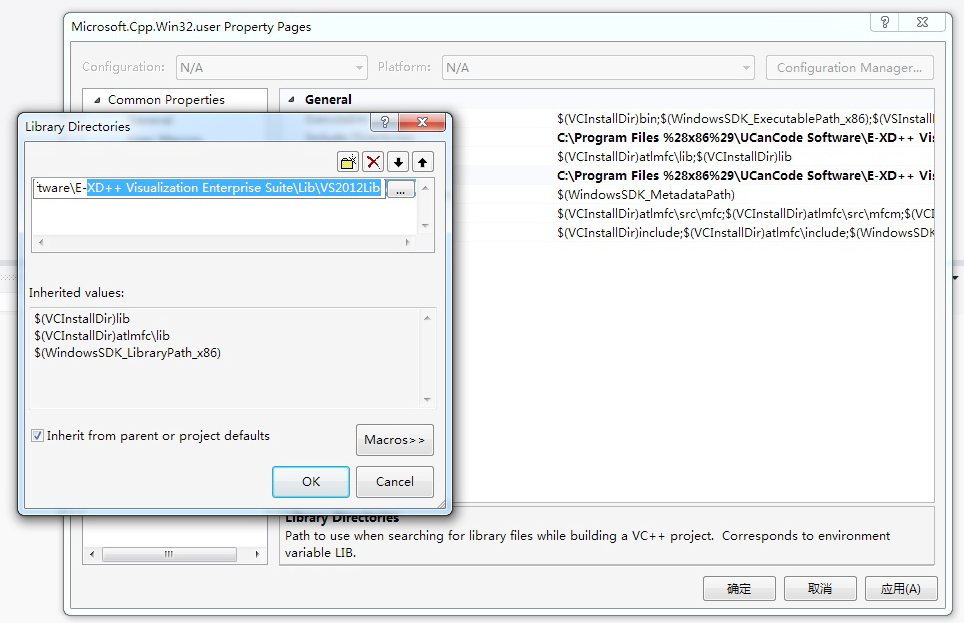
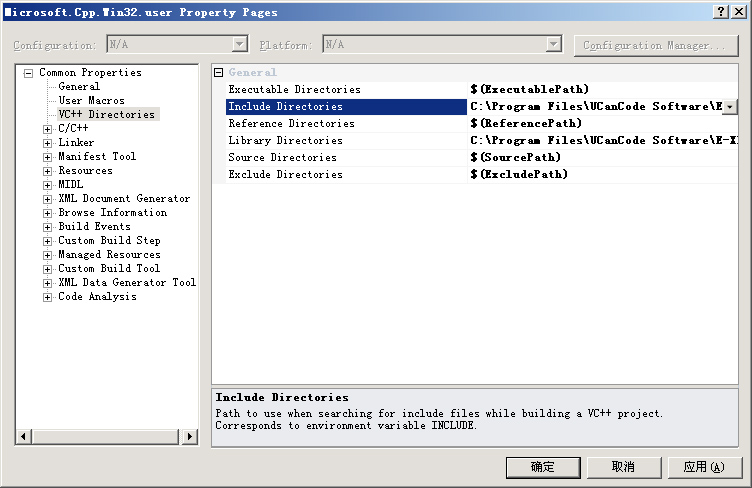
4). Select the VC++ Directories tab, do the following changes:
Also, make sure that the
include
and
lib paths only include the directories of the current
installation of E-XD++ Visualization ToolKit. Your directory settings may differ
(depending on how your products were installed), but here are some sample
directory settings:
- Sample Executable path directory settings
(based on a Windows NT installation of E-XD++ Enterprise Edition):
C:\Program Files\Microsoft Visual Studio\Common\MSDexx\Bin
C:\Program Files\Microsoft Visual Studio\VCxx\BIN
C:\Program Files\Microsoft Visual Studio\Common\TOOLS
C:\Program Files\Microsoft Visual Studio\Common\TOOLS\WINNT
C:\WINNT\system32
C:\WINNT
C:\Program Files\UCanCode Software\E-XD++ Visualization Enterprise Suite\Lib\VS2013Lib
- Sample Include path directory settings:
C:\Program Files\Microsoft Visual Studio\VCxx\INCLUDE
C:\Program Files\Microsoft Visual Studio\VCxx\MFC\INCLUDE
C:\Program Files\Microsoft Visual Studio\VCxx\ATL\INCLUDE
C:\Program Files\UCanCode Software\E-XD++ Visualization Enterprise Suite\FO\Include
Sample Lib path directory settings:C:\Program Files\Microsoft Visual Studio\VCxx\LIB
C:\Program Files\Microsoft Visual Studio\VCxx\MFC\LIB
C:\Program Files\UCanCode Software\E-XD++ Visualization Enterprise Suite\VS2013Lib
x. Then you need to close OK, then you need exit
your Visual Studio and open it again (Restart Visual Studio).
x. That's all, you can now open any sample codes of
E-XD++ for building.
5.
Visual Studio 2015
The setting for Visual Studio 2015 is not the same with Visual Studio 2008,
please take the following two steps:
1). Open Visual Studio 2015, and then open E-XD++'s sample TestMDI.dsw (It is
placed within
C:\Program Files\UCanCode Software\E-XD++ Visualization Enterprise Suite\Samples
file folder). You need to convert it before opening.
2). Then choose "View | Property Manager" menu item, as below:
3). With the property manager window, right click on
"Microsoft.Cpp.Win32.user" and choose "Property" menu, as below:
4). Select the VC++ Directories tab, do the following changes:
Also, make sure that the
include
and
lib paths only include the directories of the current
installation of E-XD++ Visualization ToolKit. Your directory settings may differ
(depending on how your products were installed), but here are some sample
directory settings:
- Sample Executable path directory settings
(based on a Windows NT installation of E-XD++ Enterprise Edition):
C:\Program Files\Microsoft Visual Studio\Common\MSDexx\Bin
C:\Program Files\Microsoft Visual Studio\VCxx\BIN
C:\Program Files\Microsoft Visual Studio\Common\TOOLS
C:\Program Files\Microsoft Visual Studio\Common\TOOLS\WINNT
C:\WINNT\system32
C:\WINNT
C:\Program Files\UCanCode Software\E-XD++ Visualization Enterprise Suite\Lib\VS2015Lib
- Sample Include path directory settings:
C:\Program Files\Microsoft Visual Studio\VCxx\INCLUDE
C:\Program Files\Microsoft Visual Studio\VCxx\MFC\INCLUDE
C:\Program Files\Microsoft Visual Studio\VCxx\ATL\INCLUDE
C:\Program Files\UCanCode Software\E-XD++ Visualization Enterprise Suite\FO\Include
Sample Lib path directory settings:C:\Program Files\Microsoft Visual Studio\VCxx\LIB
C:\Program Files\Microsoft Visual Studio\VCxx\MFC\LIB
C:\Program Files\UCanCode Software\E-XD++ Visualization Enterprise Suite\Lib\VS2015Lib
x. Then you need to close OK, then you need exit
your Visual Studio and open it again (Restart Visual Studio).
x. That's all, you can now open any sample codes of
E-XD++ for building.
6.
Visual Studio 2010
The setting for Visual Studio 2010 is not the same with Visual Studio 2008,
please take the following two steps:
1). Open Visual Studio 2010, and then open E-XD++'s sample TestMDI.dsw (It is
placed within
C:\Program Files\UCanCode Software\E-XD++ Visualization Enterprise Suite\Samples
file folder). You need to convert it before opening.
2). Then
choose "View | Property Manager" menu item, as below:
3). With the property manager window, right click on
"Microsoft.Cpp.Win32.user" and choose "Property" menu, as below:
4). Select
the VC++ Directories tab, do the following changes:
Also, make sure that the
include
and
lib paths only include the directories of the current
installation of E-XD++ Visualization ToolKit. Your directory settings may differ
(depending on how your products were installed), but here are some sample
directory settings:
- Sample Executable path directory settings
(based on a Windows NT installation of E-XD++ Enterprise Edition):
C:\Program Files\Microsoft Visual Studio\Common\MSDevxx\Bin
C:\Program Files\Microsoft Visual Studio\VCxx\BIN
C:\Program Files\Microsoft Visual Studio\Common\TOOLS
C:\Program Files\Microsoft Visual Studio\Common\TOOLS\WINNT
C:\WINNT\system32
C:\WINNT
C:\Program Files\UCanCode Software\E-XD++ Visualization Enterprise Suite\Lib
Sample Include path directory settings:C:\Program Files\Microsoft Visual Studio\VCxx\INCLUDE
C:\Program Files\Microsoft Visual Studio\VCxx\MFC\INCLUDE
C:\Program Files\Microsoft Visual Studio\VCxx\ATL\INCLUDE
C:\Program Files\UCanCode Software\E-XD++ Visualization Enterprise Suite\FO\Include
Sample Lib path directory settings:C:\Program Files\Microsoft Visual Studio\VCxx\LIB
C:\Program Files\Microsoft Visual Studio\VCxx\MFC\LIB
C:\Program Files\UCanCode Software\E-XD++ Visualization Enterprise Suite\Lib\VS2010Lib
x. Then you need to close OK, then you need exit
your Visual Studio and open it again (Restart Visual Studio).
x. That's all, you can now open any sample codes of
E-XD++ for building.
7.
Visual Studio 2017
The setting for Visual Studio 2017 is not the same with Visual Studio 2008,
please take the following two steps:
1). Open Visual Studio 2017, and then open E-XD++'s sample TestMDI.dsw (It is
placed within
C:\Program Files\UCanCode Software\E-XD++ Visualization Enterprise Suite\Samples
file folder). You need to convert it before opening.
2). Then choose "View | Property Manager" menu item, as below:
3). With the property manager window, right click on
"Microsoft.Cpp.Win32.user" and choose "Property" menu, as below:
4). Select the VC++ Directories tab, do the following changes:
Also, make sure that the
include
and
lib paths only include the directories of the current
installation of E-XD++ Visualization ToolKit. Your directory settings may differ
(depending on how your products were installed), but here are some sample
directory settings:
- Sample Executable path directory settings
(based on a Windows NT installation of E-XD++ Enterprise Edition):
C:\Program Files\Microsoft Visual Studio\Common\MSDexx\Bin
C:\Program Files\Microsoft Visual Studio\VCxx\BIN
C:\Program Files\Microsoft Visual Studio\Common\TOOLS
C:\Program Files\Microsoft Visual Studio\Common\TOOLS\WINNT
C:\WINNT\system32
C:\WINNT
C:\Program Files\UCanCode Software\E-XD++ Visualization Enterprise Suite\Lib\VS2017Lib
- Sample Include path directory settings:
C:\Program Files\Microsoft Visual Studio\VCxx\INCLUDE
C:\Program Files\Microsoft Visual Studio\VCxx\MFC\INCLUDE
C:\Program Files\Microsoft Visual Studio\VCxx\ATL\INCLUDE
C:\Program Files\UCanCode Software\E-XD++ Visualization Enterprise Suite\FO\Include
Sample Lib path directory settings:C:\Program Files\Microsoft Visual Studio\VCxx\LIB
C:\Program Files\Microsoft Visual Studio\VCxx\MFC\LIB
C:\Program Files\UCanCode Software\E-XD++ Visualization Enterprise Suite\Lib\VS2017Lib
x. Then you need to close OK, then you need exit
your Visual Studio and open it again (Restart Visual Studio).
x. That's all, you can now open any sample codes of
E-XD++ for building.
8.
Visual Studio 201 9
The setting for Visual Studio 2019 is not the same with Visual Studio 2008,
please take the following two steps:
1). Open Visual Studio 2019, and then open E-XD++'s sample TestMDI.dsw (It is
placed within
C:\Program Files\UCanCode Software\E-XD++ Visualization Enterprise Suite\Samples
file folder). You need to convert it before opening.
2). Then choose "View | Property Manager" menu item, as below:
3). With the property manager window, right click on
"Microsoft.Cpp.Win32.user" and choose "Property" menu, as below:
4). Select the VC++ Directories tab, do the following changes:
Also, make sure that the
include
and
lib paths only include the directories of the current
installation of E-XD++ Visualization ToolKit. Your directory settings may differ
(depending on how your products were installed), but here are some sample
directory settings:
- Sample Executable path directory settings
(based on a Windows NT installation of E-XD++ Enterprise Edition):
C:\Program Files\Microsoft Visual Studio\Common\MSDexx\Bin
C:\Program Files\Microsoft Visual Studio\VCxx\BIN
C:\Program Files\Microsoft Visual Studio\Common\TOOLS
C:\Program Files\Microsoft Visual Studio\Common\TOOLS\WINNT
C:\WINNT\system32
C:\WINNT
C:\Program Files\UCanCode Software\E-XD++ Visualization Enterprise Suite\Lib\VS2019Lib
- Sample Include path directory settings:
C:\Program Files\Microsoft Visual Studio\VCxx\INCLUDE
C:\Program Files\Microsoft Visual Studio\VCxx\MFC\INCLUDE
C:\Program Files\Microsoft Visual Studio\VCxx\ATL\INCLUDE
C:\Program Files\UCanCode Software\E-XD++ Visualization Enterprise Suite\FO\Include
Sample Lib path directory settings:C:\Program Files\Microsoft Visual Studio\VCxx\LIB
C:\Program Files\Microsoft Visual Studio\VCxx\MFC\LIB
C:\Program Files\UCanCode Software\E-XD++ Visualization Enterprise Suite\Lib\VS2019Lib
x. Then you need to close OK, then you need exit
your Visual Studio and open it again (Restart Visual Studio).
x. That's all, you can now open any sample codes of
E-XD++ for building.
For Visual Studio 2010
or greater, please use ClassWizard.exe instead.
In this
section, you learn how to:
(1). Install E-XD++ Library add-in
(2). Run E-XD++ Library add-in
Install E-XD++ Library
add-in
1.Copy FormAddIn.dll to any directory
you like. If you insert the DLL into the Addins directory ( Under the directory
where MSDEV.EXE resides, then Visual Studio will automatically load it the next
time it starts.
2. Start Visual Studio and go to the "Tools/Customize"
menu item. Click on the menu. The Customize dialog will appear, as follows:
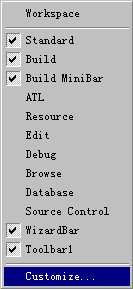
3. In the Customize dialog, go to the "Add-ins
and Marco Files" tab. If you placed the DLL in the Addins directory, then it
will show up here, otherwise use the "Browse" button to local the DLL.
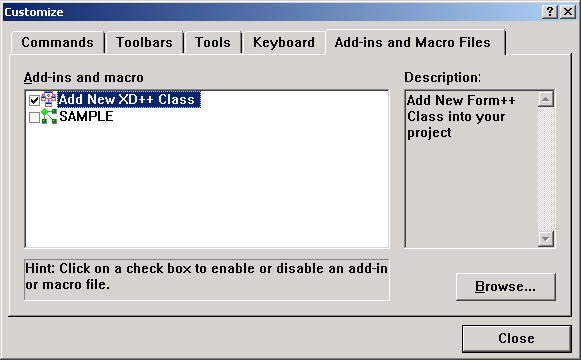
4. Once the DLL is registered in Visual
Studio, click the add-in from within the list to show its button.
5. Installation is complete. You can now
use the add-ins toolbar buttons.
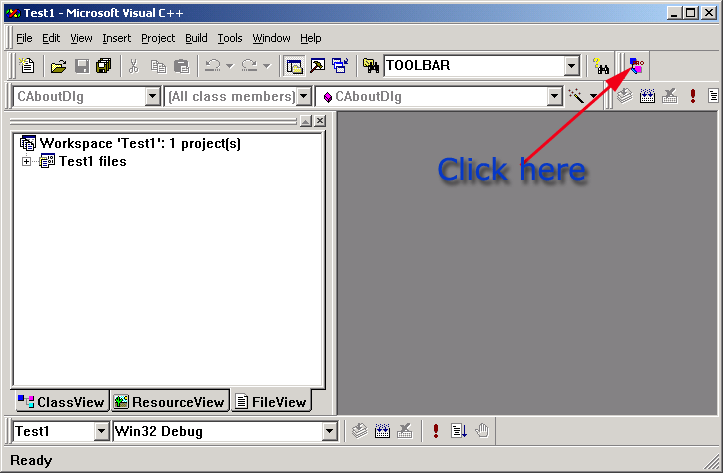
Run
E-XD++ Library add-in
click the E-XD++ Library add-in button you just
add, the following dialog will pop up:
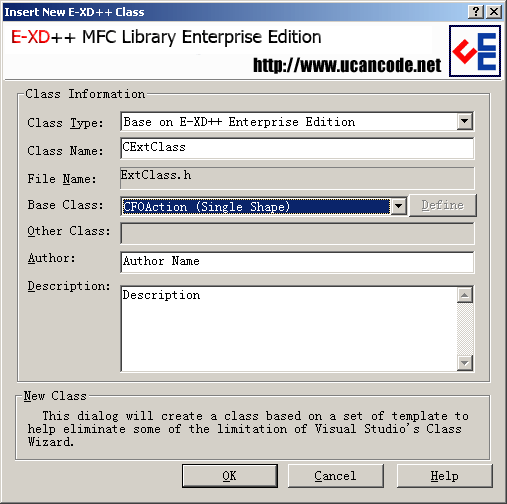
Here you can select the base class and name the
class name. Once you finish filling these options, click ok. Then the class will
be created and the corresponding files will be inserted into the project too. If
you are using Visual C++ 2010 or greater or Visual C++ 5.0, using ClassWizard.exe
instead (You can find this file within the sub folder of the product).
With the latest edition of E-XD++, three
AppWizards are also shipped for Visual Studio 6.0,Visual Studio 2010 to
Visual Studio 2024,below are the steps for setting these appwizards:
1). AppWizard for Visual Studio 6.0:
Once you finish to install the full kit or the
Evaluation Kit, the AppWizard will be automatic placed at the right place within the
Visual Studio 6.0,when you create a new project, you can find an option within
the following wizard dialog:
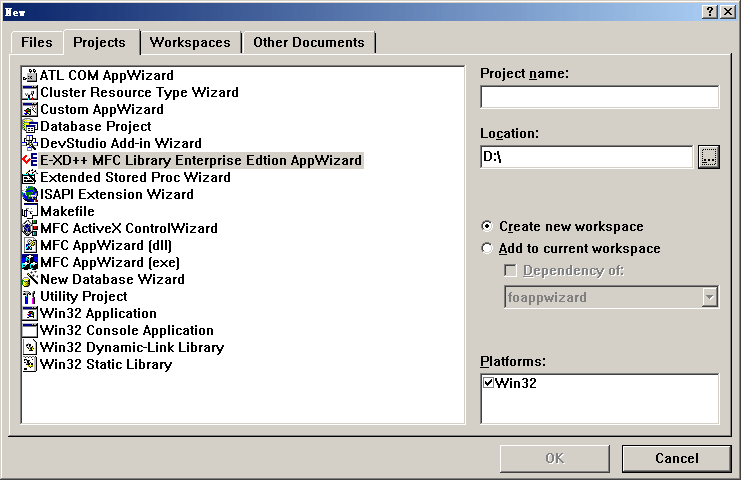
So there is no other steps you need to setup
for Visual Studio 6.0, just use it.
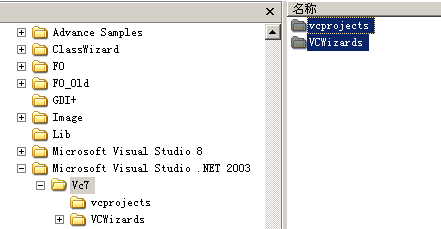
2). AppWizard for Visual Studio 2010 or
greater:
Once you finish to install the full kit or the
Evaluation Kit, the appwizard for Visual Studio.NET 2003 will be also installed, and
you can also find the following sub file folder:

The following are the steps for setting it:
(1). Open vc7 sub folder, and you can find
the following two sub folders:
(2). Select both of them (or press
Ctrl+A), and select " Edit | Copy " menu item( or press Ctrl+C), and open the
following folder of Visual Studio.net 2003:
"Microsoft Visual Studio .NET 2003 | Vc7"
(3). Then select "Edit | Paste" menu item(
or press Ctrl+V) to paste these two sub folders and place them to sub folder
Microsoft Visual Studio .NET 2003 | Vc7.
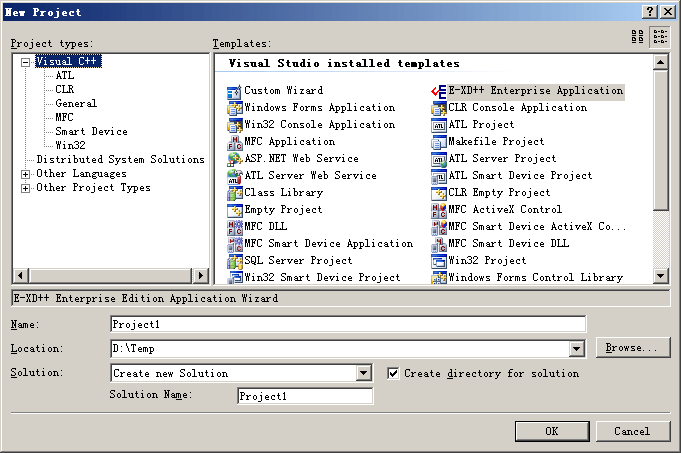
That's all, now when you running the new project
of Visual Studio.NET 2003 again, you can find the following appwizard icon, just
click it to create new project:
3). AppWizard for Visual Studio.NET 2005:
Once you finish to install the full kit or the
Evaluation Kit, the appwizard for Visual Studio.NET 2005 will be also installed, and
you can also find the following sub file folder:
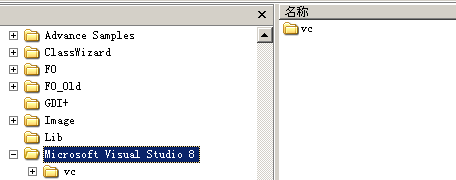
The following are the steps for setting it:
(1). Open vc7 sub folder, and you can find
the following two sub folders:
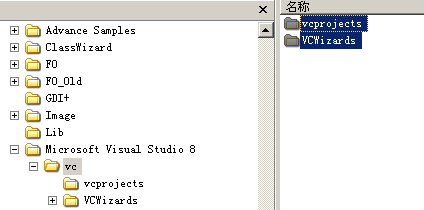
(2). Select both of them (or press
Ctrl+A), and select "Edit | Copy" menu item( or press Ctrl+C), and open the
following folder of Visual Studio.net 2005:
"Microsoft Visual Studio 8 | Vc"
(3).Then select "Edit | Paste" menu item(
or press Ctrl+V) to paste these two sub folders and place them to sub folder
Microsoft Visual Studio 8 | Visual C++.
That's all, now when you running the new
project of Visual Studio.NET 2005 again, you can find the following appwizard
icon, just click it to create new project:
For any questions, please contact us with: support@UCanCode.net, or call us with: +86-28-8535-4545.
Talk us with MSN Messager (Skeype ID): UCanCode@hotmail.com for online help at any time <recommend>.
Download: install_use_eval_kit.pdf
Contact UCanCode Software
To buy the source code or learn more about with:
|
|